Hi, artsy friends! Thanks for stopping by. :)
A new post about my unPlanner, featuring the first few pages.
May has come, and that means a new color scheme in my unPlanner.
Go HERE if you want more information or to register for The Documented Life Project 2016: The unPlanner!
This Gelliprint is the foundation of all of my pages this month:
The colors I chose came from this inspiration: Lindy's May 2016 Color Challenge. I didn't use any of her products, but I did use the colors in acrylic paint. You can get inspiration anywhere! (I did add pink, as I couldn't leave it out!)
I went crazy with StencilGirl stencils for the Gelliprint:
I made about ten different prints in this color scheme, and I used them for my weekly pages.
So here's my calendar. UPDATE: I now have this calendar available to you as a download. Check it out HERE.
A little secret tip: The reason the squiggly squares have thick and thin lines is because after I had drawn in the squares, I painted in the "gutters", and I couldn't stay in the lines. So, to hide the "mistakes" I blacked the areas out with my Sharpie marker. This "OOPS" turned out nice, I think!! :)
For the first week's doodles on my calendar, I used StencilGirl stencils again. Sorry for always mentioning these stencils.....naw...#sorrynotsorry. ;)
The tag? Mmmm...an oldie that needed a home, and it's finally not orphaned any longer. I brushed a Rae Missigman stamp with Zig Clean Color watercolor markers, spritzed the stamp with water, then stamped on watercolor paper.
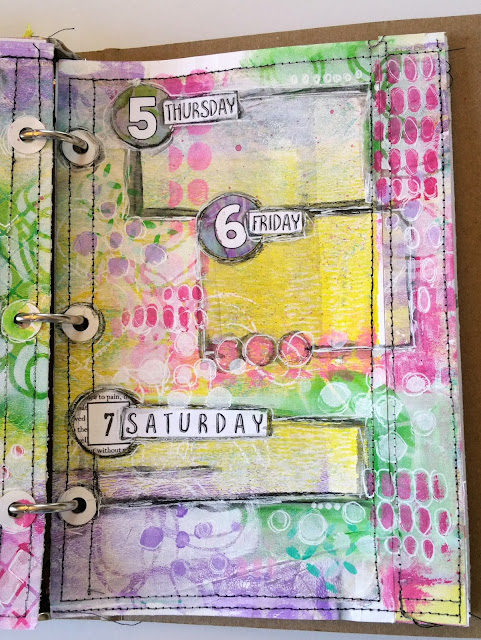
For the weekly view, I cut down the Gelliprints and sewed around the edges.
For this print, I used these stencils:
Next, I printed out the weekly view download from the unPlanner downloads. Then I cut out the day of the week names.
For the circle dates, I used a combination of designs. For the white numbers, I used my own design, I scanned in that first Gelliprint I showed you in this post. (see the first one above). Then I made these cute Gelli dots with a font on my computer in my digital scrapbooking program and created circles, printed them off, and voila! Circle dates!
To download my circle dates design for your own use, click HERE which is a link to the file in my DropBox. Please be sure to credit me if you use them and share on social media, k? :)

For the square numbers within the book text circle, I downloaded this great art journaling/gluebook resource from Right Brain Planner by Teresa Robinson. Check it out HERE.
Here is the left side. After I glued on all the numbers and dates, I stenciled and smooshed paint around, and added frames for the journaling spots with a black Stabilo All pencil.
I also added more depth with some outlining of some of the shapes I made with stencils.
The stencils I used are mostly from the April StencilGirl club stencils. They came in a 9x12 sheet, which I cut down. 12 cute little designs on this sheet. I love them all!
I added paint through stencils, added white, then more color. Lots of layers.
Add white gel pen scribbles in areas to add more dimension again.
Around the stencilled shapes.
Around edges of the journaling strips.
Over the black outlined areas of the circle dates, the reinforcements, etc.
Keep adding details, and you'll be amazed at the depth and interested in brings to your project!
See the white lines around the "diamond" shapes?
And here's the two-page spread.
And I call it done! Next week I hope to make my PAC.
Thanks for visiting. I appreciate comments and questions, letting me know you've been here. :)
♥♥♥ Anna ♥♥♥


Just come across your blog through the Stencilgirlproducts blog - just have to say WOW WOW WOW. Have immediately added it to my blog list to watch, I just love everything I've seen so far, love the colours you choose and will definitely pay close attention to everything you post now.
ReplyDeleteYou are a very talented and generous artist, all your free downloads will be most appreciated to a beginning art journaller like myself.
What a true inspiration!
Thank you, Rachel (UK)
WOW, thanks so much for your GENEROUS response to my blog post. I appreciate it very much that you left me a note. Enjoy! :)
Delete